

This article is part of a new series I’m putting together about making money with drones. The more saturated the drone market becomes, the more important it is to branch out beyond just drone photography in an effort to make money with your drones. Today we are focusing on making money with agriculture drones. This is a huge market with a still increasing consumer base, so it is definitely worth looking into.
First, I’m going to talk about the potential applications of drones on the farm and then we can look at what type of hardware and software you’d need to make this work for your business.
Making Money with Agriculture Drones: What Can my Drone Do for a Farm?
Measuring Plant Health & Crop Stress with Drones
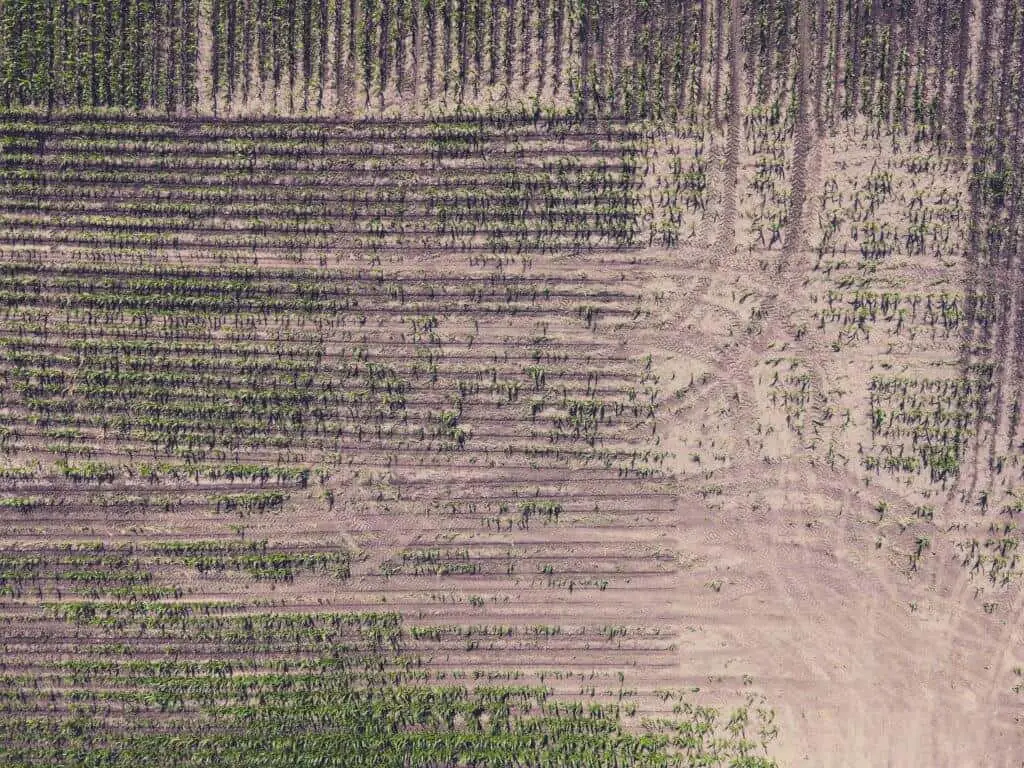
One of the most common uses of drones on a farm would be evaluating plant health and crop stress. I’ll get into the technical details of how this works below when I talk about hardware, but suffice it to say that you can use various spectrums of light to determine the overall health of plants.
This is accomplished by first flying the property to get an orthomosaic map. Once you have the map, depending on the type of camera you have, you can review the map just to see places where a crop looks visibly weaker than the rest.
Additionally though, you can also use online mapping tools to convert your ortho map into other types of maps. One index is called Visible Atmospherically Resistant Index (VARI). VARI basically uses an algorithm to determine and exaggerate colors, showing you how green a plant is. The problem with VARI is that it does not account for variations in visible light. So, flying a field in the morning versus the afternoon, or on a cloud covered day versus a sunny day could show you completely different results.
Another index is called the Normalized Difference Vegetation Index (NDVI). Unlike VARI, NDVI uses a camera that can see near-infrared (NIR) light and this difference causes NDVI to be more accurate and thus, more effective. While NIR sensors on a drone camera isn’t something that’s equipped on most consumer drones (we’ll talk about this below), if you’re going to get into assessing crop health, using the NDVI index is really the standard.
Using Drones to Get a Plant Count
Farmers also typically use what is called a plan count or a stand count to determine if the yield of their crop is in line with what they expected. Although I recognize that there are a number of tools a drone pilot (or farmer) can use, one that I have experience with is Drone Deploy, which now includes the use of a ton of apps on their website. One of these apps is called Agremo, which completely automates a stand count, potentially saving a ton of time over a manual stand count.
Assess Weather Damage to Crops
Whether you know it or not, farmers and growers routinely purchase crop insurance to protect against the possibility of weather damage to their fields. And this makes sense because particularly in farming, you tend to put a lot of your eggs in one basket. One bad weather event could spell disaster for farmers.
Needless to say, insurance adjusters are required to estimate crop loss in order to process these insurance claims. Using tools available through Drone Deploy, the map created through your drone flight can provide a more accurate damage analysis. This is because a typical process for damage loss claims involves walking a section of the damaged field. Obviously, you can miss a large section of damaged crops doing this. Alternatively, a drone flight of the whole field can probably be completed in the same amount of time that it takes to scan a small section of the field.
Compare Crop Maps Over Time
Another benefit to tools like Drone Deploy is that you can save previous maps, which allows you to compare them over time, even over the course of years. This level of information could help you compare crop yield from month to month or year to year.
Assess Field Drainage
Drones can even be incorporated into agriculture in the off-season. Crop fields are typically drained using large underground drainage pipes called tiles. Notably, normal pictures of a field in the off-season, when bare land is visible, can show these tiles pretty well. On its own, this information may be helpful to a farmer or grower, but it could also be compared against an NDVI image to see if there are any areas of a specific field that are not draining as well as they could and possibly inhibiting crop yield in that area. In some cases, the cost of installing new drainage tiles can be offset by the additional crop yield.
Drones for Ranchers
In the same way that drone technology is being used to provide a stand count for growers, it can also be used to track the movement of cattle. This could be as simple as flying the drone to the area of land where the cattle are but some ranchers have taken this a step further. Alternatively, cattle could be tagged with an RFID chip and a reader placed on a drone. When the drone flies in proximity to the cattle, it would read the RFID tag and identify each of the livestock. Finally, thermal imaging could even be used to see if any cattle are sick or possibly even giving birth.
In addition to tracking down cattle, ranchers also spend time maintaining fences, fields and gates. The ability to check your land from your front porch is certainly appealing because it would alert ranchers to potential issues but may even save them the time of showing up to the area of a fence that needs repaired with the wrong tools.
Drone Tools for Agriculture
While drones unlock a number of opportunities for farmers, growers and ranchers, we also need to have an idea of the equipment and software that is best used for the job. Making money with agriculture drones can be a little bit of an investment up front if you do it right because a lot of the drones available for agriculture have a pretty steep price tag. For instance, I’m not going to discuss fixed-wing drone options for agriculture because most of the setups cost somewhere between $18,000 and $25,000. I’m not saying it would not be worth the investment, but if you are just looking to test the waters in agriculture, you’re probably not looking to spend that much.
Your first option is just to use the drone that you currently have to do commercial work. This might be a Phantom, Inspire or Mavic series drone. And like I discussed above, if you won’t be offering NDVI images, this is an option. You can still provide a lot of benefits to farmers, growers and ranchers without NDVI images.
If I was purchasing a new drone today, I’d go with a DJI Mavic Pro 2 (Amazon link below). DJI has discontinued production on its Phantom Series , which is a little bit of a bummer to me because I think that my Phantom 4 Pro purchase was our best drone investment to date. That said, I understand why they did it. The Mavic Pro 2 is a real jump in quality, but the Mavic series has a much smaller body which allows for longer flight time and is easier to carry around.
Adding NDVI Imaging to Your Drone
The next option you have also involves just using the drone you already have, if your current drone is a Phantom, Mavic, Inspire 2 or M200. There is a company called Sentera that creates NIR sensors for these drones, which can be attached as aftermarket parts. While these sensors are not cheap, they are by far the best entry point for a drone pilot into the world of agriculture. The sensors cost about $2,000 for the Mavic and Phantom versions and around $3,500 for the Inspire 2 and M200 versions. Just so that you are aware, adding an NIR sensor to your DJI drone will void the manufacturer warranty. The silver lining here is that you can have the sensor professionally installed for you by Sentera.
These sensors also play nice with Drone Deploy, which is my go-to software service for agriculture or you can use them with Sentera’s own FieldAgent software.
Agriculture Drone Software
Like I’ve said a few times, Drone Deploy is my go-to software for agriculture drones. It was one of the first apps I used when I got my Part 107 license, but they’ve also continuously outperformed other services. A while back, they introduced an app store and they integrate with any number of other apps (including Sentera).
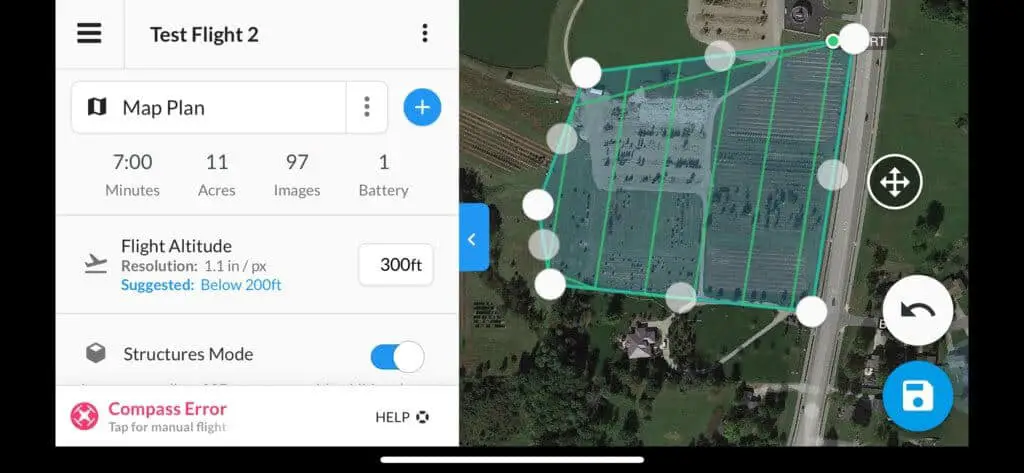
The user interface for Drone Deploy is super simple. Drag and drop your map plot and tell it how much overlap between pictures. If you have a paid subscription, you can also get a live map stitched onto your screen, which I suppose could be helpful. But in my experience, you get a much better look at everything after the fact on a computer. Below, you can see that the app will show you how long the flight will take, how many acres it is, how many images will be taken and how many batteries you will need. If a plan takes multiple batteries, you just swap out the battery and the drone returns to the place where it left off.
No matter what app you use, the importance lies in the information provided to you once the pictures are all stitched together. A monthly subscription for Drone Deploy starts at $149 ($99 if you pay for a year up front). And while that might sound steep, if you were able to get a few consistent agriculture clients, you could easy cover that fee and make some good money. In my experience, finding a client that wants more than just a one-off job is worth more than you can imagine. This is a great sector to try and get into. Maybe once you do, you can purchase some upgrades to make your services more worth it to farmers and growers.